PHOTOGRAPHY TIPS AND TUTORIALS FROM HURRICANE IMAGES INC.
POWERFUL INTIMATE VIDEOGRAPHY / PHOTOGRAPHY | www.hurricaneimagesinc.com

Monday, November 16, 2020

An Audiophile Mystery - Prana Distributions LLC


It began with an old man who loved music more than Orpheus.  What Loves he had lost to death and disease didn’t compare to his devotion— and mastery— of music.  This is a true story.  It is not fiction, it is documentary. The names have not been changed because there are no innocents.  It involves some of the legends of the audiophile world— Thrax and EnKlein— as well as mysterious newcomers like AudioNec, Trafomatic, and Synaestec. Like all mysteries there is an element of deceit, naivete, incompetence, lavish sums of money, and death.  And, like all con games, it begins with a bad actor… in this case a dealer.  And he goes by Prana Distributions, LLC.

Every con game starts with a hook.  In this case, the Mark had been hooked years ago.  His love of music and brought him into the audiophile world little by little.  The systems changed every few years, and despite not belonging to the economic class of the wealthiest of music-lovers in his every day life, he slowly entered that world in his listening room.  Two years ago, he owned a pair of Thrax Lyra speakers, with Basus subwoofers, Thrax Spartacus amplifier, CEC player and transport, and EnKlein cables to bring out the best the system had to offer.  The hook was deep in him.  All that was needed was someone to pull on that hook… to convince him that there was a more magical listening experience.  For a price. The question was how to convince someone to spend $205,000 dollars on a stereo system he’d never heard.  Prana Distributions had the answer: a guarantee.


Prana Distribution started their pitch with a 30 day, money back, no questions asked guarantee. On June 11th, 2018, in answer to the question, “where can these speakers be heard in the NY area?” #PranaDistribution replied: “Currently, the best we can offer is a consultation.  Following that, if it is agreed that AudioNec should work well in your space, we can order the appropriate pair with the understanding that you may return it in 30 days.” It was a pledge that was to quietly evaporate over the course of the next few exchanges.  The guarantee may not have been written in invisible ink, but the promise was.

At the end of one’s life it’s natural to want to experience one’s passions at the deepest level, to reach beyond one’s limitations and, like Icarus, touch the sun.  For the Buyer, a composer and musician, the sun was a musical immersion that rivaled the sound that he heard in his imagination as he composed.  He knew he didn’t have much time left, maybe a year— probably less.  His kidneys told him that. His doctors concurred.  The man’s affairs were in order; his children taken care of.  His physical ability to enjoy life was waning but his hearing largely intact.  What was left in full-blooded passion was hope.  Imagination.  Could he hear something new?


There is a con game so famous that it has its own name:  The White-van Speakers.  Yes, audio speakers. The con works by offering a piece of equipment that is priced at ridiculously high margins, then sold “out of a van” for a secret, special discount. But the sale price is still well above the manufacturing costs and market value.  How do you convince your Mark that the speakers— or amplifier, or DAC— is still worth tens of thousands?  You give them an exotic origin… some faraway, unexpected birthplace.  Then you place them next to other, reputable systems… Soul Sonic, Lindemann, Trafomatic, AudioNec, Destination Audio.  Can you spot the White-van?

The deal the Buyer agreed to was a $75,000 deposit with a trade on his existing Thrax based system.  The invoice listed an address of 125 Cambridgepark Dr. Suite 301, Cambridge, MA, but Prana didn’t want the check sent there.  With a grifter’s caginess, it was a dummy office.  A virtual office, owned by Regal.  There was no showroom, no permanent address. National buyers never checked that sort of thing. Instead, the address he provided, 69 Boston Avenue in Medford, was the run-down sort of house one inherited and then neglected.


Prana Distribution fake address

Prana Distribution Real Address

In exchange for the $75,000 deposit and trade of his existing, Thrax based system for a pair of AudioNec Crystal Signature speakers, Trafomatic Tara preamp with mono blocks, a Synastec Origio CD player, and Ictra rack.  The old system was to pay the remaining $130,000 bill.  The deposit was paid in July of 2018.  The system was to be delivered in September.  At the time, #Prana Distributions didn’t tell him that the Syneastec was still in the design stage and wouldn’t be ready for sale until February at the earliest. There would be nothing to play the Buyer’s CDs.  It wouldn’t matter, though.  He died in August of that year.

I won’t say Prana cheated the Buyer, depriving him of his dreams at the end of his life.  He never had to witness the cascade of failures, from CD players that were promised before they even existed, to Pran’s inability to sell even 1/10th of his system.  Yet it’s hard not to say that the con wasn’t in motion, the cheat in progress.  The Descendents asked about the 30 day guarantee, but somehow that didn’t apply to a sale that included a trade.  The contract, if the five sentences tacked onto the invoice could be called a contract, didn’t include a guarantee.  Or time frames for delivery.  Or percentages for commission.  The field was now wide open for a bad actor to run any direction he liked.

To be continued.... (this blog is a serial post based on the Facebook page - the story unfolds in paragraphs published three times a week)

Monday, August 31, 2020

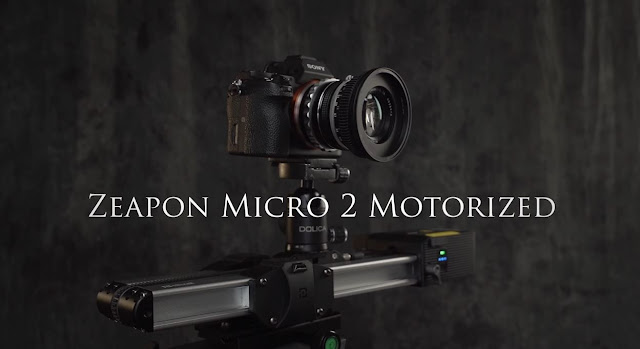
Zeapon Micro 2 Motorized Slider Review

Zeapon Micro 2 Motorized Slider Review


There’s something about motorized sliders that make them nearly impossible to make right.  If you think about it, manufacturers can make an extremely complex tool like the Zhiyun Weebill S, able to move on three axis, be packed with features like Bluetooth, tracking and vortex mode, camera control, and be considered one of the best in its class for about $350 bucks.  That would get you a bargain basement motorized slider that moves back and forth in a straight line.  High end models will run you a grand. 
 
Which made me very curious about the Zeapon Micro 2, which appeared to solve many of the difficulties sliders… apparently… inherently have.
As I was making this video I learned that Zeapon has just two new models that are larger, the 600 which spans 29 inches and costs 500 hundred dollars.  And the 800 which travels 37 inches—making it a full sized slider—and costs roughly $600.  They’re identical to the Micro 2 in construction, with the exception of the Easy Stand, which is designed for the larger span. Given the construction of the Micro 2, I think these are a safe bet, quality-wise.  I can easily see how this construction would hold up over a longer distance.
And I’m guessing that the shortcomings of the original Zeapon Micro 2, few that they be, are  going to be the same in the larger models, too.  So let’s get down to it.


I personally love the double slide design of the Zeapon.  At 16 inches in length, it creates a travel path of 21 inches, which is enough for most uses.  The challenge of this design, which has tripped up other manufacturers, is that even the smallest play in the system is amplified into a full on shake or tremor.  Since you CAN’T mount this design on two tripods, the single point of contact creates a lever for movement. The Zeapon, however, is built like a tank.  And the motorized version is a hefty club.  Without battery it's 4 pounds. That’s primarily a strength, but it does mean that despite its tiny footprint, it doesn’t travel so light.  It’s small but chunky, making it a bit awkward to pack. The mounting area is rock solid, and the innovative design includes a rail cleaner, which is pretty neat… but also reminds you of the problem of dirt and scratches.

Zeapon Micro 2 Motorized Slider Rail Cleaner


Every slider has two major hurdles to overcome.  Is it easy to set up, and is it smooth?  On both of these counts, the Zeapon does an excellent job.  But there are a couple of caveats.  The hefty weight slider means that it’s only as stable and tremor-free as the system you put it on.  I chose to not buy the pricey Easy Stand because I rarely set my slider on a table.  It always goes on sticks.  But here, your sticks matter. 
Despite being travel friendly, you can’t put it on travel tripods.  They’re not stable enough.  And you need one beefy tripod.  Extra beefy, if you’re going to take advantage of its 17 pound max payload.
Eleven pounds, however, is the max recommended.  It can move this weight vertically as well, which is impressive. 
If you buy the motorized version—rather than the motor and slider separately—you won’t get the cable you need to operate it manually.  If you want to push it by hand, that’s another purchase.  And, they don't seem to readily offer it at Zeapon (maybe if you email them).   But it’s probably not worth the effort, because it takes some doing to swap out the cable.   This is an “ease of use” issue that is pretty minor, but I’m still sorry it’s so difficult to do.  Sometimes it’s just faster to use your hands.
On the question of smoothness, I’ll say the Zeapon does an admirable job here as well.  The slider glides effortlessly.  The Zeapon has a great feature, which is the ability to set your beginning and end points on the slider by double pressing the Power button to set the first point, then moving to your end point and double pressing the Power button again.  After that, each time you double press the Power button it will wait a second and then move between points.  You can clear your points by pressing the forward and back buttons simultaneously.  The double tap system is quick and responsive, and it helps make up for the fact that you can’t move the slider by hand.  You’ve got three speed options, which will cover all but slowest and fastest of movement.  It’s medium slow, medium, medium fast.

The other thing to keep in mind is that slider is only as jiggle-free as the head system you have on it.  Larger heads will be more stable, and keeping your system “short” helps.  In other words, don’t put a monitor on top of your camera.  It’ll be top heavy.
Motorized sliders have two more issues they have to solve, and that is noise and versatility.  The Zeapon has been touted as extremely quiet, and this was my only real disappointment.  It’s wonderfully quiet at the slowest speed, but pretty noisy at the fastest.  On high, you can easily hear the motor whine from seven feet away, which is within most mic setups.  

If you were shooting an interview with the slider moving at full speed, I’d say this is unacceptably noisy.  But in reality, with just 20 inches to travel, you’d never set it to zip back and forth for an interview.  You’ll most likely be under half speed, and the noise level is perfectly acceptable at that speed.  The fast modes will be something you’ll use for B-roll where sound doesn’t matter. 

Zeapon Micro 2 Motorized Slider App


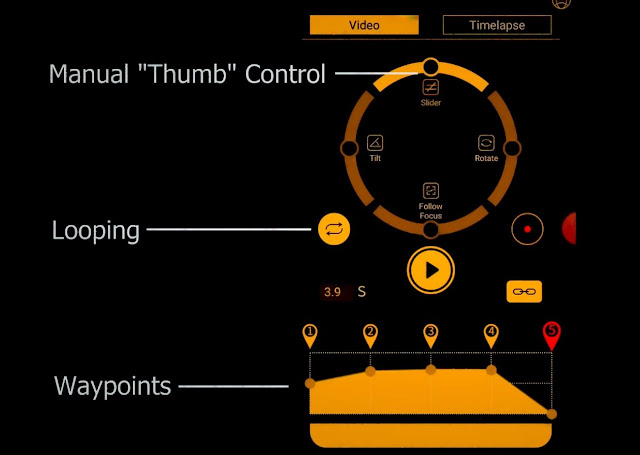
The second challenge for motorized sliders is versatility, and nowadays that challenge is always answered with an app.  The Zeapon app is a simple affair, but really there’s only so much a left-to-right movement can do.  You’ve got point A and point B on a straight line.   In the Zeapon app you can make this move with your thumb.  In reality, it’s hard to control the speed that way, or be consistent, so it’s not very useful.  The grayed-out options for tilt and pan have raised the hope that Zeapon is planning a motorized head—fingers crossed.  We’ll see.  The app does allow you to program the slider to loop continuously from A to B, which is good for interviews.  And you can set three “Way” points in the middle where it will change speed.  This allows you to ramp up and down, and program more artistic movements.  I imagine this feature will be especially useful on the longer models.  On the Micro 2, there’s not a lot of distance to play around with.
The app also allows you to set up time lapses.  The feature is generally workable, but I would have liked to have the option to unlink the speed and number of shots.  As is, when you set the image interval, it spread that out across the distance.  Longer intervals mean a longer capture period, which may not be what you want.  Time lapses aren't necessary supposed to be smooth.  
Zeapon just released a firmware update for the slider that let’s you setup the loop mode using the buttons as well. After setting your end points, you press the arrow and power button once to start looping.  A second press of the arrow and power buttons stops the loop. I’ve included a link to the new firmware below.  It’s bit tricky to install. You need to:
1. Download the Updater. 
2. Unzip the Rar folder—or would that be “unRAR the RAR folder?” The folder contains both the updater software and the firmware file, which is a UFWB file
3. Open up the installer
4. Boot your Slider into Update Mode by holding down both Arrows and then pressing the Power button.  The light will be red.
5. Plug your slider into your computer with the USB C cable
6. Select the firmware in the app
7. Click “START FLASH”
8. The app will say it’s done before the slider is ready—so you HAVE TO WAIT UNTIL THE LIGHT TURNS GREEN before unplugging the cable.
9. And you’re ready to go.


The motorized Zeapon Micro 2 costs roughly $400 dollars, and for the quality it’s worth it.  Unlike cheaper sliders it feels like a professional bit of gear.  The shortcomings of the unit is noise at faster speeds, and the difficulty in switching it to manual operation.  On the plus, the 21 inch distance is enough to be versatile, and the impressive weight capacity means you can get most any camera on it.  It’s smooth, easy to set up, and EASIER to carry…. which makes it a slider you’ll likely use.

Thursday, August 27, 2020

What We Do to Keep Clients Safe During Covid 19


Let's be honest.  Work has gotten a lot harder, and part of the reason is that being in a room with others, no matter how exciting the project, makes people uneasy.  The Coronavirus epidemic means we have to take extra precautions to stay safe.

Many of our clients are in the health field.  In face, producer/director Ian Walker spent 18 years as an educator and communications specialist at The Environmental Health Investigations Branch of the state health department.  They're still one of our clients.  And we've worked with numerous others in the health field.  Based on experience in the health world, there are six health precautions to apply to our productions, including use of the space, crew size and personal protection.  You can read about what we do at Hurricane Images blog:    http://hurricaneimagesinc.com/what-we-do-to-keep-clients-safe/


Monday, August 24, 2020

HYPER-CHARGE YOUR WORKFLOW ON SET


The light is fading; the client is waiting... efficiency on set is always at a premium.  Speed and ease of setup is especially important to me because most of the time I’m working alone, without a sound engineer, grip, or production assistant.  My clients don’t want me to spend two hours setting up, but they do want me to pay attention to them.  So tools that help me maintain the highest quality while focusing on them are game-changers.  Here are five of them.


Number 5:

A boom pole holder.  I know this sounds really slight, but I love how easy this is to use.  I used to just put my boom directly into my grip head, but then I was always worried that the grip would damage the pole if over-tightened.  Which it did on occasion. It became a balancing act between tightening it enough to hold the pole, but not enough to damage it.  And if you’re not using grip heads, they’re awesome in terms of simplicity, strength, and reliability.  When you add the simplicity of the boom pole holder, you’ve got a professional, streamlined process that lets you focus on other things.


Number 4:  Tripod.  I’m not going to spend a lot of time on this one, because when it come to a speed tool, it doesn’t matter what kind of tripod.  You should buy the tripod that best fits your needs and the style you shoot. But what I have found is HAVING the tripod there gives me a portable table to place my camera, freeing up my hands to do other work without worrying about my baby getting dirty or trampled.  This means I try to bring a tripod even when I know there won’t be any tripod shots.  I’ll just bring a small portable one.  Even a mini, table-top tripod is helpful if you have to travel light.


Number 3:  Arca Plates.  Now it doesn’t have to be Arca, they are high quality quick release plates that are a little less expensive.  The key here is to buy an abundance of them and use one system across all of your equipment.  I have Arca plates permanently attached to my tripods, gimbal, and cage, allowing me to move the camera around with a minimum of fuss.  The permanent plates mean I can move my camera from tripod to a fully balanced gimbal in about 30 seconds, and to a cage in about 10. $40 bucks in Arca plates will save you hours in the field.


Number 2:  Xume filter holders.  Now these are kind of pricey.  I’m honestly surprised that there aren’t inexpensive Chinese knock-offs of the Xume, because they can’t cost much to make, they’re simple, and very useful.  The annoyance of filters is that they take time to put on, especially if the threads on your lens or filter get damaged.  If you’re in a hurry, it’s sometimes easier to crank up the shutter speed to keep your aperture setting, but that’s just not optimum. If you’ve watched my Tilta Mini Matte Box review, you know that I also use these for my matte box, too—though with the caveat that you have to be gentle with it attached, and not all of the magnets are equally strong.  

In the Xume system, you need one attachment for your camera lens, and another for your filter.  I’ve got holders on the three lenses I use the most, and on two filters.  The lens attachment is about $35, and the filter attachment is another $15.  This means I’ve dropped roughly $135 into this system, but I have to say it’s been worth it for me.  The one bummer is that it can be difficult to get your lens cap back on, depending on the style and the individual cap. They sell lens magnetic caps, but that’s another 15.


Number 1:  The number one thing that speeds up my workflow on set isn’t sexy, it’s not going to impress my client or getting anyone excited.  But this one tool speeds up my workflow more than any other, and saves me from headaches in the field:  it’s how I pack my bag.  It’s not about a specific technique, it’s about always packing it the same way, or as close to the same as possible.  This means I always know exactly where my tools are.  I can grab them quickly, I can pack them quickly because I’m not trying figure out their best placement, and I can also see that they’re packed at the end of the shoot.  


This is really about good prep, and that principle applies to a number of things that can speed up your workflow and raise the quality of your work.  “Prep”… is scouting your location before the shoot date so you can strategize the setup and what to bring.  Prep is getting your client prepared before they show up.  Prep is knowing the sequence of events so you can have the right tools ready.  It’s a shot list for a narrative piece, or a storyboard if that helps you understand the set-up better.  It’s coordinating your crew if you’re lucky enough to have one.  And all it costs is the time it takes to do your prep.

Now there are a number of other things that help speed up my workflow:  wireless mics, like the Rode Go are great, though wireless systems always come with a slightly degraded sound quality compared to a wired system.  Dual recording is a must for solo operators like me.  Battery powered lights or a large battery pack like this one can save time and make for a more flexible system.  A small hip bag means I can carry an extra lens, my filters, and have a place to put my camera if I DIDN’T bring a tripod.  Even your choice of camera make a difference when it comes to working quickly in the field.

So those are a few of my favorites. If you have a tool or tip for speeding up your workflow in the field, leave a comment below.

Friday, August 21, 2020

Top End Field Audio Recording Gear

The professional field recordist is a rare beast... a near-mythical creature that can only be spotted in the wild... or the urban... or the underground.  So it's not often that you can sneak up on one and see into their high end audio bag.  It's a specialized field with only a handful of top level practitioners, and their tools range from the common gear may video production companies use to esoteric mics only used in their line of work.  Luckily, Marcel and Libby from Free To Use Sounds are willing to share their knowledge.  

One of the first things that stands out is that a versatile kit doesn't rely on just one recorder and a couple of mics.  But it goes beyond more gear.  You have to understand the strengths of each mic, recorder, cable, attachment.  


Field recordists are always on the go, which means that some their gear overlaps with what you'd find in a videographers bag:  The Zoom F6 and Zoom F8, Diety V-Mic S2 and (to my surprise) the Rode VideoMic Pro are all part of Marcel's regular gear.  But then there are truly unique pieces like the DPA D:screet CORE 4060 and the AKG Pro Audio C411 PP mics.  Whether you choose to upgrade your kit or not, Free To Use Sounds provides helpful info on how to better capture room tone, foley, and ambience, so check out their channel.  And here's a list of their complete setup:

Zoom F6 Field Recorder/Mixer : https://geni.us/FTUSZOOMF6  
Zoom H6 6-Track Portable Recorder: https://geni.us/FTUSZOOMH6  
Zoom H3-VR 360° Audio Recorder: https://geni.us/FTUSZOOMH3VR  
Zoom F1-LP Lavalier: https://geni.us/FTUSZOOMF1  
Zoom F8n Professional Field Recorder: https://geni.us/FTUSZOOMF8N  

DPA d:screet CORE 4060:
https://geni.us/FTUSDPA4060  
Deity V-Mic D3 Pro:
https://geni.us/FTUSDEITYVMICD3
Deity S-Mic 2S Shotgun Microphone:
https://geni.us/FTUSDEITYSMIC2S  
AKG Pro Audio C411 PP: https://geni.us/FTUSAKGC411pp  
Rode VideoMic Pro
: https://geni.us/FTUSRODEVMICPRO  
Mogami Gold STUDIO-10 XLR:
https://geni.us/FTUSMOGAMIGOLD 
Sony MDR7506 Headphones:
https://geni.us/FTUSMDR7506SONY 

K-Tek KSF6 Stingray Bag for Zoom F6:
https://geni.us/FTUSKTEKF6BAG  
Rode Wind Protection:
https://geni.us/FTUSRODEWOMBAT

Wednesday, March 25, 2020

Tilta Focus Handle Power Grip Review


The Tilta Side Focus Handle gives you battery power with USB and DC output, control over your Nucleus Nano follow focus, and a holder for a Samsung external SSD. That’s a big upgrade for $229.  And it’s compatible with every camera cage out there.   But is it made to last, and is it the right tool for the job?

I’d been waiting a long time for a handle that was also a secret power solution.  First, it was for my Sony a7s2.  Those batteries were cheap, but an hour is hardly sufficient.  My Sony a73 was a nice step up in terms of internal battery power, but you also have accessories like the Tilta Nucleus Nano and external monitors to consider.  You have to get power to them somehow.  When I started looking for convenient power options-- specifically a rig handle with it's own secret battery, there was nothing on the market. Two years later, the first power bank handles started to appear, but I’ll admit I was put off by the clunkiness and size of them.

My Z Cam E2 opened up a new possibility.  I was aware of NP-F batteries that also had USB output, but of course you need a bracket to hold it… and size-wise this started to feel like a lot for just powering a Nano. But now now the NPF battery could power the camera and the Nano simultaneously, and it’s a decent solution for that camera in a pinch.  But only a pinch because unfortunately the USB output on these batteries turns off when the Nano stops drawing power for 60 secon which is... let's say, awkward. The Batteries also  underscored a bigger problem.  With the Nucleus Nano on a heavier setup, you really don’t want to have one hand dedicated to pulling focus.  It’s too easy to introduce camera shake.  Once I had the Nano attached, I really wanted a larger monitor for focus pulling, and the combination ended up being fairly fairly beefy.


So the Tilta handle system hit the market, I was excited.  The NPF 970 model of the handle offers control of the Nano, and a DC output for powering my monitor as well.  The improved placement of the focus wheel and the weight-bearing strap makes it possible to pull focus without putting a tremor into the system.

Tilta offers several versions of the handle, with models that accept both NP-F and LP batteries at a couple of sizes.  They have versions with and without the Nano flywheel, and three options for attaching it to your camera cage.  And while that seems like a lot of choice, the absence of other options was the first thing that stood out for me.  My handle is designed specifically with the Z Cam in mind, but Z Cam’s don’t play well with the Samsung SSDs.  So I would have preferred a more generic SSD holder or none at all.

All versions of the handle are for the left hand only.

Overall, the handle is well-made.  The sides, including the SSD bracket, are metal, and the darker material a lightweight plastic.  The strap is a nice leather deal. The bigger model is… well, big.  Your fingers barely reach the opposite side of the grip. The outputs are on the bottom, which is an… okay choice.  I originally thought it would keep the cords out of the way, but they have to rise up to reach their destination, so I’m not sure it helps much.  It does mean that you’ll want to buy cords with right angle plugs to keep them from sticking out so far.  Which brings me to another sticky point.
The USB is 8 volts, which is much more powerful than your typical USB (awesome).  This is especially true for the Nucleus Nano, which performs better at higher voltage.  The DC is 12 volts, which I think may be the max the NPF batteries can output. So the voltage is great.  But 12 volt plugs are much less common than other voltages, and this means you’ll probably need an adapter to make it compatible with whatever you’re powering.  The USB out is a micro USB, so most likely you’ll need a micro to micro cable, too.  One actually comes with your Nano, if you haven’t lost it already.  These cables aren’t expensive, but it would have been nice if Tilta had included them with the handle. 
Speaking of missing things, the handle doesn't come with a battery... which is somewhat understandable and yet still somewhat cheap.  NPF batteries in this size cost about $30 (less in bulk) and for a handle that's all about power, you'd think Tilta could have thrown one in.

The flywheel on the handle, however, is pretty awesome.  With the strap to hold the weight of the camera, the location is perfect for manipulating the wheel.  And it has a little resistance to it, so it’s smooth and easy to control with no bounce back when you reach your mark.  The NPF 970 version of the handle, mine, has an auto calibrate button that works just like the original Nano controller.  One press, and it automatically finds the endpoints of your focus ring if your lens has a hard stop.  Unlike the original controller, you can’t manually calibrate the wheel, or set your endpoints by hand.  And there’s no A-B function either, at least not that I’ve found.  There’s no manual for any of these handles, and that’s a glaring problem, especially since the smaller model only calibrates by hand.  One thing to note: the handle isn’t wireless.  But that’s not really an issue, because you need a wire to power the motor anyway.


The 8 volt output is an improvement over the 2 volts of many small USB batteries.  You can control larger, stiffer lenses with it.

I love that I can power my Atamos Ninja 7 from the handle.  When the batteries are on the back of the monitor, it makes everything top heavy and more difficult to shoot handheld.  The NPF 970 battery will power the Atamos for about 50 minutes.  So, you’ll burn through a few batteries on a full-day shoot, but that would have been the case without the handle.  I decided on the larger, 970 model for just this reason.  While the 570 version of the handle is half the price and smaller, I knew that it would only power my monitor for about 20 minutes.  And it's missing the hand strap, which is extremely helpful.

Another note:  NP-F batteries from different manufacturers can be slightly different sizes.  The slightly larger ones are a bit of a pain to get in and out of the handle. While this is generally true for every piece of equipment they’re connected to, the lack of places to grip the battery make it especially difficult on the Tilta handle.  This isn’t Tilta’s fault, but you do need to be careful that you don’t damage the electrical connections.

Perhaps my biggest gripe—and it’s not a huge deal—is the gap between the handle and the camera.  This space here, while a relief for beefier fingers, is really bigger than it needs to be. Without an SSD, it feels ridiculously big.  Most of the time, you want to keep your rig as compact as possible, so these feels like a misstep.  I bought the smallest, flattest Rosette attachment I could find to help minimize the awkwardness, but it's still almost twice the width I'd like.

Unlike the Nucleus Nano and the Mini Matte Box, the Tilta handle doesn’t come in a neat kit with all the attachments.  That makes it feel like a bit of an off-hand effort.  You still need to supply the cables with right angle plugs, the battery, and possibly the Rosette attachment for your rig, and these little things add up to another sixty or seventy bucks.  So your handle is now closer $300.


So, what does that mean in the final analysis?  If you have a Tilta Nucleus system, I’d say it's a worthwhile investment. The flywheel handle is awesome.  While it doesn't offer all of the capabilities of the original Nano flywheel, it's far easier to use on a handheld rig.  Keep your wheel for a tripod or a dedicated puller. I wish Tilta would make the smaller, NPF 570 version with the hand strap, because that makes a big difference in terms of ease and convenience. I also wish they offered the 970 model without the SSD holder.  It would make the whole unit smaller.  If you just want the power capabilities, I might wait a few months and see what other products enter the market.  The USB and DC options are great, but the little inconveniences of the handle make it an imperfect solution.  And let’s face it:  if all the handle does is outputs for a battery you provide, 120 bucks for the smaller version and $200 for the bigger is way overpriced.  The Tilta handle only makes financial sense if you need the Nucleus control, too.

I hope everyone is staying safe out there in these trying times.  Be well.

Saturday, March 21, 2020

MicroFogger2 - The Fog Machine That Fits in Your Hand


Today I’m reviewing a quirky little tool that’s found its way into my bag.  As I’ve fine-tuned my work as a cinematographer, I’ve increasingly explored the importance of texture in an image.  Most of the time I’m just trying to get the basics of the shot.  You want it in focus, and well exposed without blown highlights or depthless blacks.  You’re making sure the white balance is correct, and if you have the bandwidth, maybe you’re playing with that color on set, adding gels and changing color temperatures to bring more visual interest to the scene.  


And maybe, just maybe, you’ve experimented with haze or fog to give dimensionality to your background. But the problem with fog machines are they’re big and cumbersome, slow to operate and fog is challenging to control.  Machines typically typically use 400 watts of power or more, so you need a wall socket to plug in the unit.  You can buy it in a can, but that’s expensive, and if you use too much surfaces become wet and glossy.  And everything starts to feel a bit ick.

And then I discovered the MicroFogger 2 by Workshopscience.com.  It’s tiny.  At 5 inches, by one and a half, by two, it’s the smallest fogger I’ve seen anywhere.  And it’s battery powered.  It’s also fairly well made.  

You never really want to drop any piece of electronic equipment, but it’s nice when it feels like it won’t shatter if tipped over.  

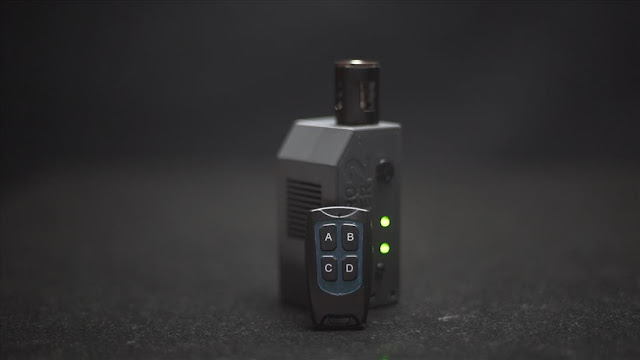
The Microfogger is easy to operate.  It heats up quicker that a traditional fogger, and is ready to produce smoke roughly 30 seconds after you switch it on.  It produces a surprising amount of fog for its size; the amount is much less than a full sized fogger, but similar to the haze in a can products.  It’s not silent, but it’s quiet compared to full sized units.  You can hold it in your hand; the tip gets warm but won’t burn you, and casing doesn’t heat up at all. And the fogger 2 comes with a remote so you can put it somewhere on set and fire it up from a distance.  


Operation is simple yet mysterious.  It’s really important that you read the manual to understand how to use it safely and not destroy the unit.  They also have a useful video on their website. The Power button switches it on and off, but unlike most technology, you press it five times quickly.  That’s because the Power button also starts the smoke, so a long press will produce smoke.  There are two smaller buttons for adjusting the volume and flow of smoke through a rather confusing system.  


I’m not sure how volume and flow are two DIFFERENT things here, but the remote helps simplify things to three power settings that range from an unattended cigarette to a gushing pipe. The two LED lights change color, flash, and can tell you a whopping 14 different things about the unit, from battery level to heating coil problems… which just brings me back to the importance of reading the manual and maybe saving a copy of it on your phone.

The big question I know everyone has at this point is price… and it’s not inexpensive.
  

The MicroFogger 2 comes in at about $150 bucks.  If you’re used to the cheap, forty dollar foggers that are made for Halloween effects, the amount seems crazy. I’ll admit I anguished over this purchase. But when I compared it to the haze in a can products that can cost anywhere from 12 to $30 bucks a pop, it’s suddenly seemed like a reasonable investment. Especially considering it’s a quarter of the size, and you can refill it for about fifty cents a charge. Then I came across the Tiny S, a battery powered fog machine… for $800, and I thought maybe I should bite the bullet on the MicroFogger 2. You’ve also got professional systems like the Antari for roughly a grand.  These will produce volumes of smoke that you can use both indoors and outside to create a foggy forest, but that’s really something you’d want to rent, not buy.


The unit does have a couple of downsides beyond the cost.  Due to the small size, you can only run the fogger in 10 second increments. It pauses automatically after that. The heating coil is burning off the fog juice, so it needs time to recoat the coil.  After 10 more seconds, you can fire it up again.  At this size, it’s not going to fill a ballroom with haze, or create a giant billow of smoke for your talent’s entrance.  But it will create a nice haze in a small room, and it’s great for interesting product shots.

According to the manufacturer, you need to put some care into the unit when it’s not in use.  First, you need to empty out the fogger if you’re not going to use it for a couple of weeks—no leaving the juice inside until the next shoot—and you should charge it every three weeks or so to protect the battery.  

The makers also recommend using their fog juice because the liquid is thicker, and I’ve yet to experiment with other brands that are cheaper or more convenient to buy.  

And the unit came with an extra heating coil… so I guess I can expect that to wear out after some amount of use.  We’ll see.

The bottom line? Well, the size is incredibly attractive.  If you shoot products, music videos, or narrative films, the convenience factor may make it a great creative tool. Even if haze isn’t something you normally use, you can throw it into your bag for the odd occasions when it IS useful (just don’t forget to charge it regularly).  It’s not cheap, but it’s comparatively a great deal, especially if you value a battery powered system.  So while I’ve never felt a huge need for fog or haze in my shoots, I did decide to take the plunge and shell out a significant amount of cash for this unit.  I’m hoping it makes itself useful.

Check out the rest of our work at Hurricane Images Inc.
www.hurricaneimagesinc.com